CT
I really like the factory LED interior lighting, it modernizes the interior and gives a certain coziness, so I have not left the thought of it since the purchase of the car. Another evening, monitoring various design options on Civics and other cars, I decided to install an OEM device and began searching for it. After some time I found a new one for a completely reasonable price, called, paid and picked it up in 2 weeks.
When I opened the box, I was very surprised by the complete set in small details and the most detailed instructions on as many as !72 pages 51 points and in 5 languages: English, French, German, Dutch and Italian. Therefore, the installation became a very pleasant experience
 Equipment
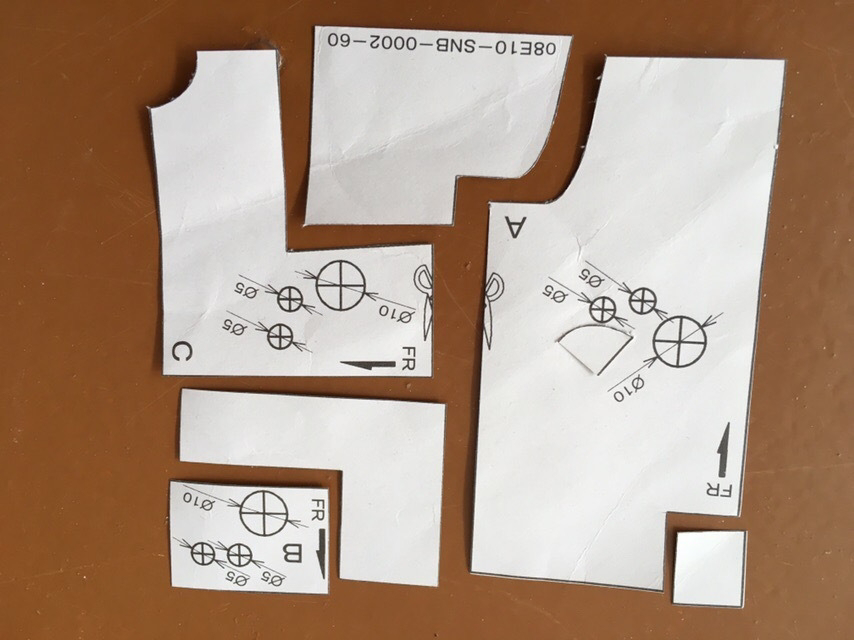 Cut out the stencil
 I apply
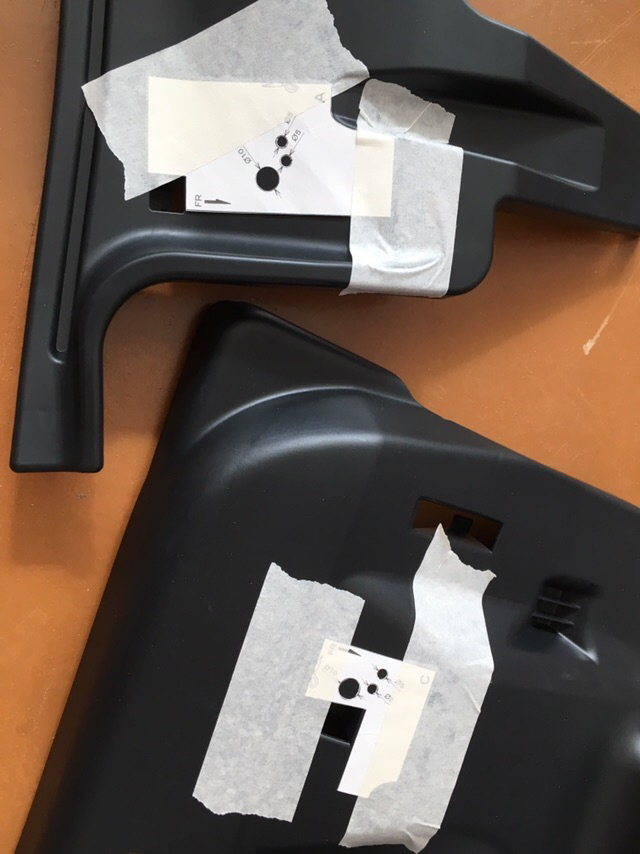 I fix it with masking tape and drill holes of the required diameter
 Inner side
 Face
Face

 Wiring diagram for the backlight
 Diagram of the gasket above the steering shaft + location of the negative contact
 Now without plugs))


I really like the factory LED interior lighting, it modernizes the interior and gives a certain coziness, so I have not left the thought of it since the purchase of the car. Another evening, monitoring various design options on Civics and other cars, I decided to install an OEM device and began searching for it. After some time I found a new one for a completely reasonable price, called, paid and picked it up in 2 weeks.
When I opened the box, I was very surprised by the complete set in small details and the most detailed instructions on as many as !72 pages 51 points and in 5 languages: English, French, German, Dutch and Italian. Therefore, the installation became a very pleasant experience
As soon as it got free time, I removed the trims and took them home. I washed them from dust, dried them and started the most terrible part - drilling the trims. Fortunately, there is a cool stencil, according to which making the correct holes for the lampshades will not be a problem.
Next, i assemble all this stuff, wrap it with electrical tape near the green chips, as stated in the instructions.
The most attentive ones might have noticed that of the three backlight lampshades, two have white tape and one has blue tape. Moreover, the lampshade with the blue tape is installed to illuminate the pocket under the climate control. Visually, they are no different, they shine the same, but the instructions prescribe installation in exactly this order. Who knows - write why?
The next day, I went to the box and pulled the wiring and installed the button.
The next day, I went to the box and pulled the wiring and installed the button.
Wiring harness
Well, here's a photo of that very original backlight. In real life, the light is not bright, more subdued than in the photo, and does not distract from driving at all, but gives a certain airiness to the panel.
I haven't drilled the cover for the central lamp yet - I don't know if there is a need for light there, and there is a cord for connecting a phone sticking out there. And if I make a backlight, then the USB should be moved to the pocket under the curtain behind the selector. For the sake of the overall picture, I also threw on the central lamp.


No comments:
Post a Comment